Lunch and Learn: Supporting Remote Workers with ice
by Shaundalee Carvalho | Published On April 24, 2020

On Wednesday, April 22nd, ComputerTalk hosted the first of its series of COVID-19 related Lunch and Learn webinars. The topic was Supporting Remote Workers with ice.
Account Manager, Mackenzie Wilcox moderated and ComputerTalk’s Training & Documentation Specialist, Kathika Uthayakumar, provided training. Kathika showed webinar attendees how to set up remote access for employees working from home, how to create or modify broadcast messages, and how to modify time of day settings. If you missed the session or would like a refresher, you can view a recording of the webinar below or read on for a brief summary:
How to set up remote access for employees to use ice while working from home
If you are working from home during the COVID-19 pandemic, you can still use iceBar like you would at the office. To enable this, you may need to download iceBar on your home computer and/or change your remote DN.
To use iceBar on a home computer, the first step is to log on to your organization’s iceManager website with your ice credentials. From there, click on the ICEBAR tab and then click Download to download iceBar. Alternatively, you can use iceBar for web (if your organization has enabled it for your ice configuration). You can do this by clicking on the red square in the top left corner of your screen to open iceBar and clicking on the user panel in the top right corner to log into or out of queues.
The next step is to change your connection address if required. A connection address is where an agent accepts calls and may be a phone number (DID) or a sip address for Skype or Teams. You may be required to change your connection address if, for example, you usually take calls at a desk phone and would now like to take calls on your cell phone instead. Note that if you normally use a sip address and need to switch to a DID, you will need to discuss with your account manager first. To change your connection address, launch your iceBar application. When the login window opens, click Advanced to open the profile window. At the bottom of this window, there should be a field that says Use iceMA assigned remote DN/Address, which will likely be checked off. Click to deselect it. In the field Roaming DN/Address, type in the new connection address (either a DID or sip address) you wish to connect to. Ensure that your User ID and Password are entered in their respective fields and then click OK. You can now proceed to use iceBar as you normally would. If you typically consult with your co-workers at nearby desks in person, note that features such as Place Call (internally), Consult, Conference, and Quick Text may be more helpful to you now that you are unable to consult in person.
If you are a team lead, supervisor, or administrator and you would like to change your agents’ connection addresses for them, you can do this in the iceAdministrator tool. After you have logged on, either through the Citrix portal, or an application installed at your workstation, check that you are in EDIT mode. You can change modes by clicking Mode on the toolbar at the top of your screen. Once in EDIT mode, click on the Users, Queues, Teams, & Skills folder in the left sidebar, then on the Users subfolder. From there, select the user whose connection address you wish to change. Next, click on the Connections tab in the main window. In the Connection Address/Remote DN field, type in the new connection address for the user. Click the save icon in the top left corner and then switch out of EDIT mode using the Mode button.
How to create/modify broadcast messages and other scripts
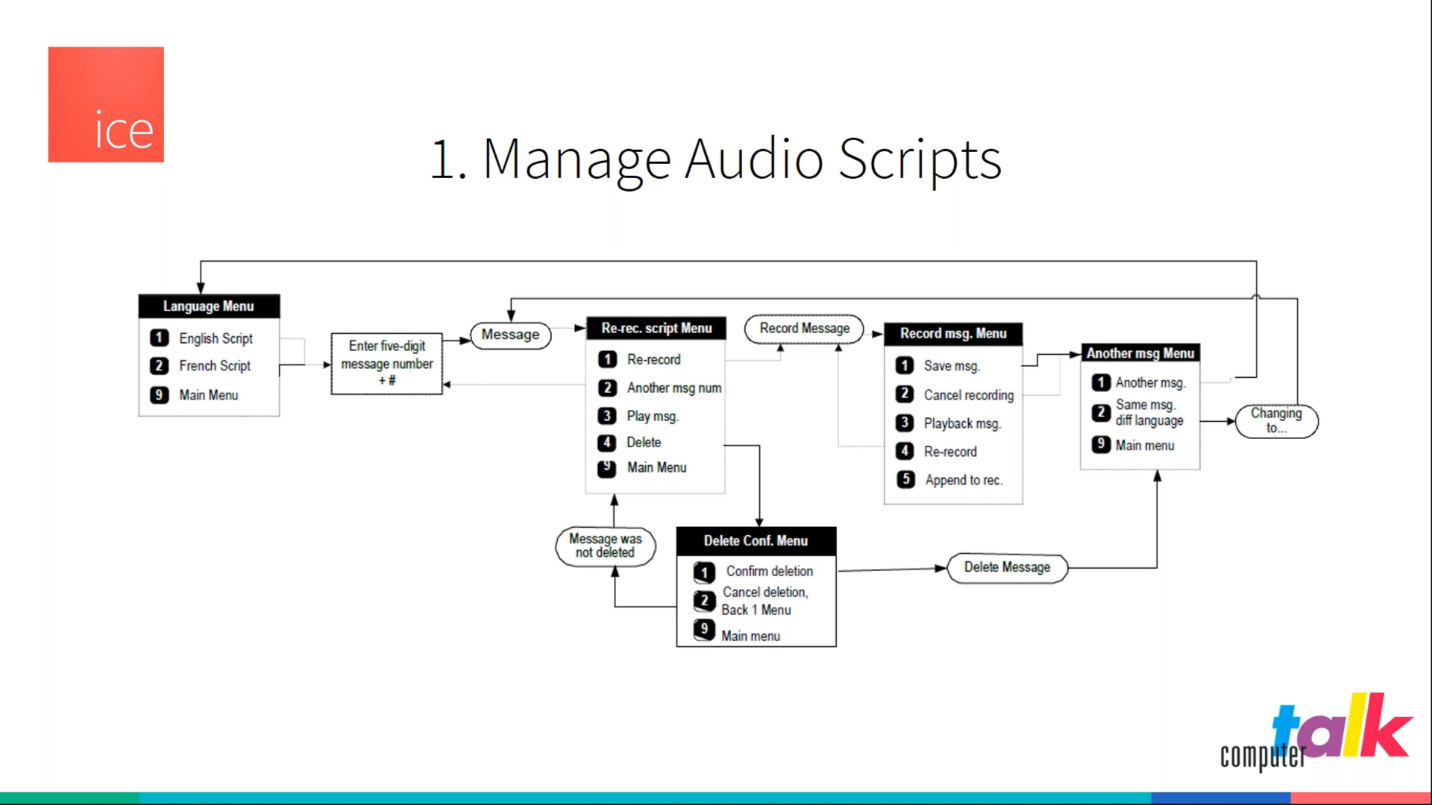
To change your broadcast or other messages, you will have to call into your organization’s System Admin IVR. If you are unsure how to do this, refer to your design document or contact your account manager or ComputerTalk’s HowTo team. System Admin will present you with 5 options:

If you want to change any of the audio scripts in your ice system, dial 1 to manage audio scripts. You may want to change audio scripts if, for example, you are changing your operating hours and need to reflect this change in your hours of operation script. You will be prompted for a language selection, and then for the ID number of the message you want to change (these numbers can be found in your design document). The selected message will play and then you can follow prompts to re-record it and then save it.

To update the broadcast messages that play to all customers calling in (usually after the welcome message), you will need to dial 2 in your System Admin IVR. The current status of all your broadcast messages will play. You will then be prompted to select a broadcast message number (from 1 to 6). The selected message will play, after which you may follow prompts to re-record, enable or disable it, or go to another message. Continue following the prompts until you have recorded and/or enabled all the broadcast messages you wish to play to all callers.
How to modify time of day (TOD) and holiday settings
If your organization has changed its hours because of COVID-19, you can update your time of day (TOD) settings in iceAdministrator (if you are a supervisor or administrator in ice). After launching iceAdministrator, make sure you are in EDIT mode. Then click on the Workflow folder in the left sidebar. In the Search tab in the main window, type “check time schedule” into the Find Workflow Action containing text field. Double click on the search result to go to the location of the action. Click on the Check Time Schedule action to open the hours of operation window. Click on times to edit them and then click elsewhere and you will be prompted to save your changes. Once you have edited and saved your new hours of operation, click OK. After the window closes, click the save icon in the top left corner of your main screen and then switch out of EDIT mode to complete the process.
We hope this training has been helpful to you during this difficult time. Keep an eye on your inbox to watch for your invite to our next webinar. In the meantime, if you have any questions, feel free to reach out to your Account Manager or the HowTo team.
More from our blog
 Today’s customers expect faster, more efficient, and more convenient experiences when they contact businesses, but they’re not willing to compromise on the security of their data. That’s why it’s so important for organizations to ensure they’re investing in the right...
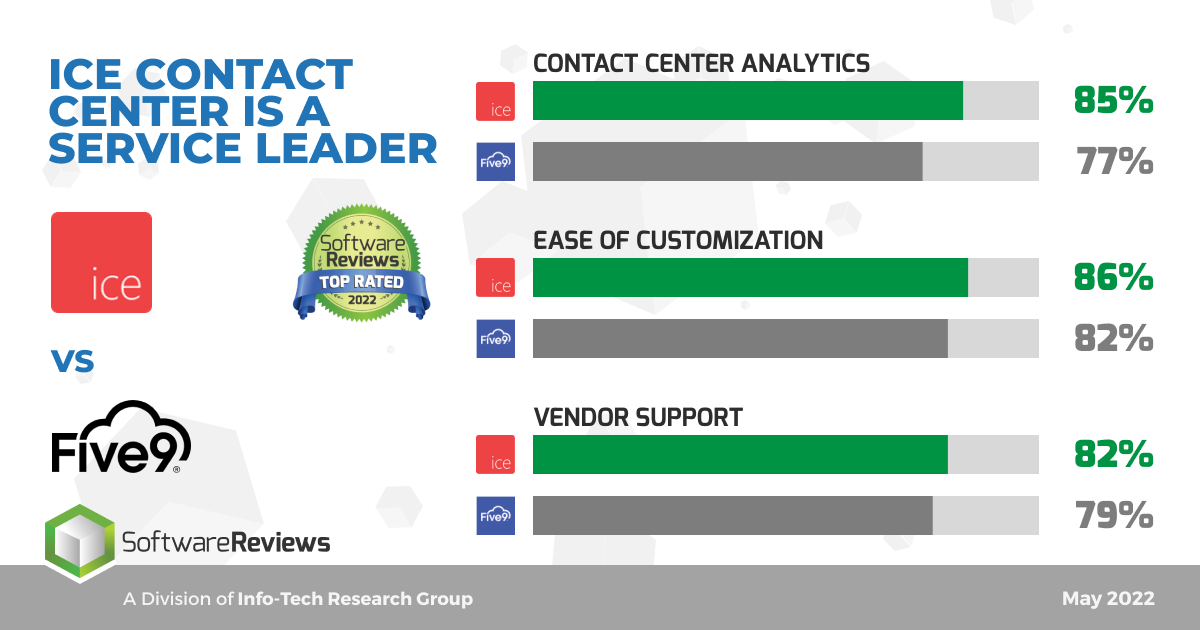
 ComputerTalk is pleased to announce that we have been scored as a leader against Five9 in the InfoTech Research Group’s SoftwareReviews.
 I’ve had the privilege of growing my career as a lead engineer while helping guide ComputerTalk through one of the most transformative eras in our history.

